
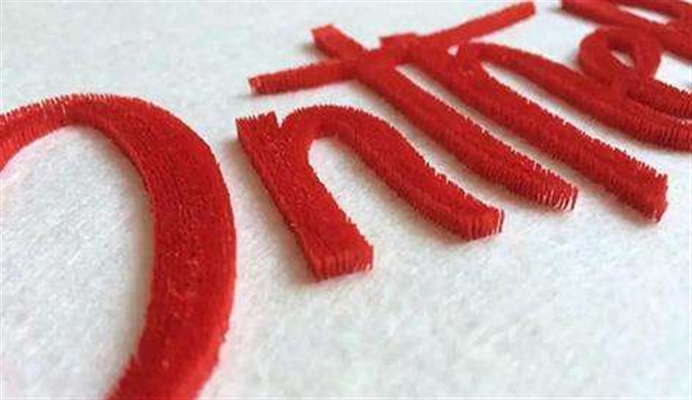
Toothbrush embroidery is a new type of embroidery that has emerged, which is used in clothing, home accessories, crafts and other fields.
It is in the ordinary embroidery process, in the fabric to add a certain height of accessories (such as EVA), after the embroidery is completed, use tools to repair the embroidery thread on the EVA, remove the accessories, it forms an embroidery like the shape of a toothbrush, commonly known as toothbrush embroidery.
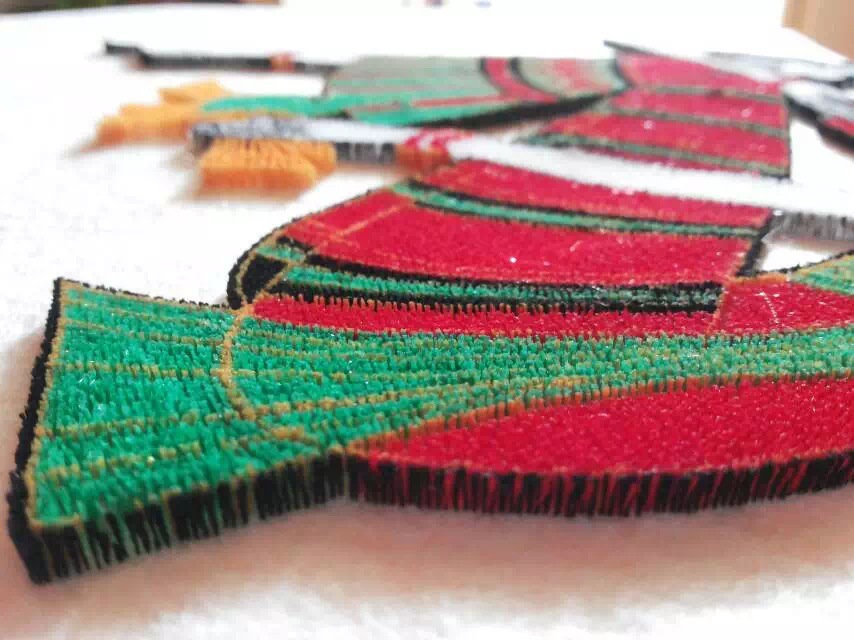
Toothbrush embroidery and flocking embroidery are two different concepts, toothbrush embroidery focus embroidery thread stands up like the hairs of a toothbrush. Flocking embroidery is an embroidery formed by pulling out the flannel wool, and the hair is down.
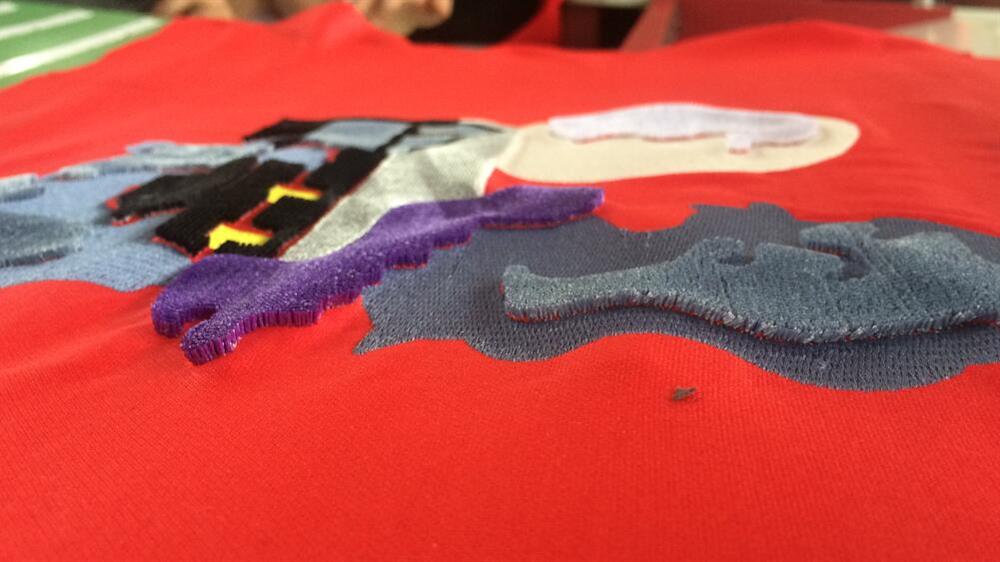
In addition, toothbrush embroidery is different from towel embroidery. Towel embroidery is the embroidery thread towel embroidery on the cloth, so that the embroidery pattern has multi-layered, novelty, three-dimensional sense of strength, etc., and can achieve flat embroidery, towel embroidery mixed embroidery, greatly improve the use grade of computer embroidery machine and expand its application field, can be widely used in clothing, home accessories, handicrafts and other industries.
Production method of toothbrush embroidery
Reverse toothbrush embroidery refers to the effect of turning the fabric upside down and processing it after embroidery on the back, the effect embroidery thread embroidered on the reverse side will stand up neatly, but because it is reverse embroidery, it is not conducive to a variety of embroidery methods mixed embroidery, usually used in the occasion of pure toothbrush embroidery. Front toothbrush embroidery refers to the effect of embroidery on the front of the fabric, because the face line is knotted with the bottom line, the effect of the processing embroidery thread will appear messier than the reverse embroidery, but it can be combined with other embroidery methods such as flat embroidery to make the pattern richer and more diverse.
Reverse embroidery production steps:
1.According to the size of the pattern, use the opening tape to walk the single line opening position on the sand net.
2.Cut off the sand net along the outer frame of the single line, and paste double-sided adhesive along the perimeter of the cut hole for three-dimensional glue.
3.According to the size of the fabric, add a circle of double-sided tape for pasting the cloth.
4.Put a layer of sand net before pasting the three-dimensional glue to prevent the embroidery thread from falling into the three-dimensional glue during embroidery.
5.Paste the three-dimensional adhesive on the double-sided adhesive, and at the same time, in order to facilitate embroidery, you can also add a layer of wax paper on the three-dimensional glue.
6.Stick the fabric back side up on the double-sided tape.
7.Put a layer of ironing on the embroidery area, and then carry out embroidery.
8.Use iron and other tools to make the iron hot and dip on the embroidery thread to prevent the embroidery thread from loosening after processing, or you can use ironing to prevent the embroidery thread from loosening after processing.
9.The ironed embroidery products are reversed for processing, just cut off a layer of sand net on the surface and then take away the three-dimensional glue to get the toothbrush embroidery effect, mass production is best to use a sheet skin machine for processing.
10.Sheet skin machine for processing.
11.The peeling thickness of the sheet skin machine can be adjusted according to the requirements, the usual peeling range of these machines: 0.6~8mm.
Front embroidery production steps:
1.Use the opening belt to open a single needle on the sand net.
2.Cut the sand net along the outer frame of the single line.
3.Apply double-sided tape along the edge of the opening.
4.Add the necessary backing according to the characteristics of the material.
5.After attaching the cloth with the front side of the cloth, first embroider the flat embroidery part.
6.The flat embroidery part is completed.
7. Put on three-dimensional glue (EVA glue).
8.In order to prevent the stitches from getting stuck in the three-dimensional glue, add a layer of sand net on top of the three-dimensional glue.
9.Embroider the toothbrush embroidery part.
10. The toothbrush embroidery part is completed.
In order to prevent the embroidery thread from loosening, add ironing glue to the bottom surface of the embroidery product.
Precautions for toothbrush embroidery
1.Patterning usually uses a single needle walking method, the density should be determined according to the thickness of the embroidery thread, generally 120D/2 embroidery thread with stitch 0.6mm X density 0.6mm, 200D/2 embroidery thread with stitch 1mm X density 1mm.
2.If you use a thread above 200D/2, it is best to choose 14# needles or more needles, it is best to use a thick wire hook, otherwise it is easy to plug the thread.
3.The height of the needle bar pressing cloth foot of the embroidery toothbrush embroidery part should be adjusted appropriately.
4.The hardness of three-dimensional glue (EVA glue) can be from 50 degrees to 75 degrees, and the thickness can be determined according to actual needs.
Post time: Apr-11-2023